|
|
|
|
|
|
|
|
My First Pin-Registered Contrast Mask
by Lynn Radeka
Easier than I thought!
I was taking a breather one afternoon in Seattle, Washington in 1989 and decided to stop into a grocery store. Picking up a copy of Darkroom Techniques Magazine (then called by a different name) I was drawn by the title of one of the articles inside. It was written by Dennis McNutt and Marc Jilg and it was about contrast masking. Prior to this I had already experimented with some basic masks on my own, mainly sandwich type masks which I designed to brighten localized areas of the image. This particular article (currently included in the Contrast Masking Kit) dealt with increasing shadow contrast and it required a glass carrier and some sort of pin-registration system.
As I read the article, the possibilities of this technique seemed to jump off the page at me and I saw this method as a means to end the persistent problems photographers face with attaining crisp detailed shadows, regardless of the paper contrast used or the actual overall contrast of the negative. I have thrown away so many prints over the years because of dull, lifeless shadows that I began accepting these "inescapable" qualities as a fact of life for the photographer. But now this article seemed to tell me that this problem could be overcome. Excited at the prospect, I imagined that the technique probably would be plagued with problems and perhaps what I was reading was more theory than fact. Still, I thought to my self "what if...." hoping that if I followed the instructions to a tee this masking technique would work as the article claimed.
When I got home I immediately built my first pin-registration carrier using the instructions in the magazine article. It was fairly crude and I certainly expected it wouldn't work very well. I selected a 4x5 negative which was plagued with contrast problems. Previous printing attempts using a high grade of paper contrast on this negative never gave me the kind of crisp print quality I wanted. Admittedly this negative was poorly exposed, underexposed by as much as one stop from the ideal. Even so it suffered from the same problems that many of my prints from good negatives did - dull flat shadows lacking in rich vibrant contrast. My objective was to make my very first SCIM (shadow contrast increase mask) and hope that it's effect would somehow enhance the richness of this image and overcome the dull quality.
The SCIM was easy to make following the general instructions in the article. I dried my first SCIM mask and made my first masked print with it.
In the dark under the safelights I couldn't really tell if the SCIM was having any major effect as I watched the image solidify in the developer. After a minute or so of fixing I turned on the room lights. What I saw at that moment changed the way I would view fine printing forever. It worked! The local contrast in the dark values was stunning, yet the middle tones and highlights were preserved. In fact, the midtones and highlights took on a remarkable glow - a sort of silvery luminous quality which I rarely saw in my prints in the past.
This print differed dramatically from the unmasked print - so dramatically that I was instantly hooked. The deeper values were not blocked up - beautiful vibrant detail seemed to sing from this image from the deepest dark values all the way through the highlights. Examining the test print closely, I could not even tell that a mask was used had I not known I used one. The mask effect was seamless.
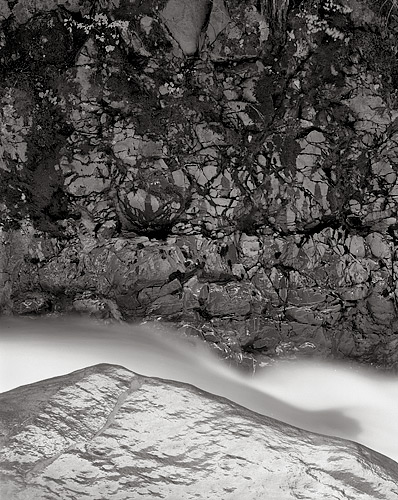
My first SCIM print - Boulder, Textural Study, 1987. Washington.
 |
 |
|
|
Print made without any masks, grade 4 paper
|
Print made with SCIM mask, grade 4 paper
|
 |
|
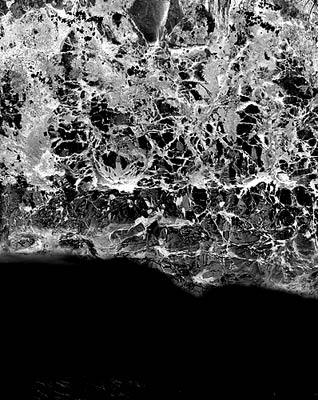
SCIM mask used to make final print
|
Notice that in the print made with the SCIM (top right image), the midtones and highlights are unaffected by the mask. This allowed the foreground boulder and flowing water to retain a delicate, soft quality. The SCIM only affected the deepest accents within the dark moss areas and the cracks between the rocks in the top 2/3 of the image. It is easy to use a dodging or burning tool when making the SCIM exposure for further localized control, or even opaqueing specific areas of the SCIM to prevent those areas from being affected.
All
photographs on this site are copyright © Lynn Radeka. All rights reserved.
Precision
Pin-Registration Carrier System copyright © 2002 Lynn Radeka. Patent
pending.
Contrast Masking Kit copyright © 2000 Lynn Radeka.